Bear with me, this is going to be a really long post. I hope you think it's worth it in the end. I still have it hanging up and keep looking at it... it's SO cute! Am I allowed to say that? Hmmm... well, you be the judge. :)
I started out with my plain Onesie and I buttoned it up and folded it up with a ruler in the middle to mark the midpoint.
I drew a line at the midpoint and repeated on the backside.
I measured how wide this Onesie was and doubled the number to figure out how long to cut the waistband. Now that I'm looking at it, I think it's hilarious that I used my metal measuring tape!
Since it is 8 1/2" wide I cut the waistband 18 inches long (to allow for seam allowance- is that what it's called?) and 4" wide. Then with the right sides facing each other I sewed it closed.
Then I turned it inside out and ironed it flat with the seam lying in the middle (you'll see this later).
Next I cut the body of the skirt. Since the fabric was 42" wide I went with that as the length. To figure out how long I wanted it, I laid it on top of the Onesie and made sure it covered the bum and added a little more for a seam allowance. It ended up being 8 1/2" x 42".
Next I folded up the bottom edge, ironed it, and then sewed it.
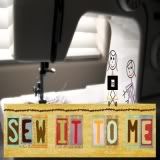
I adjusted my sewing machine to the longest stitch.
And then I sewed all along the top of the skirt.
Now for the fun part! I pulled the bottom string and made it ruffle/gather!
I kept the waistband close by and gathered the skirt enough so that it would match up with the waistband (the waistband is folded in half in this picture).
When I got the skirt to the desired length, I taped the bottom thread so that it wouldn't move and drive me crazy.
Next I folded the waistband and skirt in 1/2 and pinned them together at the midpoint.
From there I worked my way out and pinned the skirt to the waistband using the seam on the waistband as my guide.
Low and behold!!! It matched up!
Next I stitched the two together. I turned it over and sewed it because I could just see myself completely missing the waistband since I can't see it from the backside.
Oh! Make sure you change your settings back so you're not like me and have a 1 inch section with loooong stitches!
So as I worked my way along the waistband, I just took out the pins so that the foot didn't get caught up in them.
TA DAAAA!!!! Look at how pretty it is already!
Next comes the part that stresses me out.... attaching the skirt to the Onesie. I always either end up mismatching it with the skirt too big or too small. So this is a new technique for me. I found the midpoint of the Onesie.
I left about 2 inches on the waistband and started sewing my way around.
If you look closely, you can see that I used the lines that I drew before as my guide.
I sewed all the way around and stopped when I had about 2 inches left on the waistband. I let both ends lie on top of each other and eyed how much of an overlap I had.
Then I turned it inside out, pinned the two sides together, and sewed the two sides together.
Then I turned it right side out and finished off the top part of the waistband. Success!!! It was the right size!! That might have seemed like a long process, but I messed up a couple of skirts that still lie in my craft room uncompleted because either the hem or waistband didn't match up with the skirt. I'm so happy that this way worked out. :)
Ok... it seemed like something was missing. The skirt was so cute, but the top was so blah... I wanted to balance it out somehow. I took a ribbon and adjusted my sewing machine to the longest stitch again and sewed a line down the middle.
Then I scrunched it up by pulling on the bottom thread.
I thought about making a cute flower to put on the top, but played around with it and decided to line the collar with my ruffled ribbon! I pulled the corner back and hand stitched the ribbon on.
Here it is with the shoulders pulled back.
And now with them down.
And here it is all together!
And the cute snaps hiding underneath!
OMGoodness!!! I wish I could fit into this!! Seriously, I just want to crawl into it. But it's got me thinking... what about those fitted tanks?? They make them so long now... wouldn't this work on those? Hmm... I have some in my dresser.... I want to give it a try!!
Again, sorry for the long post. I think it took longer to blog about it than to make it. LOL


15 comments:
That is the sweetest onesie I have ever seen... what a great idea... and so simple... love your ideas... you are one talented lady... love the tutorials too.
Oh this is so cute!! And so easy, which is my favorite! :o) And yes, it does work on tanks, too! I've seen a couple of people do it before, it's gorgeous!!
That is adorable!
i love the fabric you used. I will feature this at somedaycrafts.blogspot.com Grab my "featured" button.
You did a great job and your tutorial was really easy to understand too. :) Visiting you from Today's Creative Blog. :)
How adorable is this. What a wonderful idea and such a cute dress. Great job!
That is adorable! I wish I had girls to make them for! It reminds me of t-shirt dresses I wore in the late 80's - my mom would attach fabric to extra-long t-shirts in the same way. Sweet blog!
ps -thanks for stopping by my blog last week :-)
Very Creative idea. Turned out so cute! Thanks for sharing on Today's Creative Blog.
:)
Brenda
This is so gorgeous!! I don't know how to sew (I really, really want to though) & I think I might be able to follow this --- maybe! Your directions seem awesome! I don't even have a baby girl anymore & still want to make it & keep it!! (but would love to make this for a gift - I guess I'd have to give it away!) Just darling!
SO glad I found your blog!! This is great!! Thanks for the tutorial :)
SOOOOO adorable! I love it and I love your blog! I;m a new follower :) I'd love it if you stopped by my blog too :) Thanks for the inspiration!
Adorable! Thank you for the tute!
I love it! It's so cute! I definitely will be making some of these for my niece! Thanks for the inspiration! This would be a great addition to the Show & Tell! ;)
Roeshel
Years and years ago I used the same principle to make my daughter very similar 'dresses' She was a little older so I added a skirt to a plain t shirt and added the same material around the arms. Yours is very cute!!!
This is crazy!! I was just wondering how to do something like this since my baby has all those cute onesies but no skirts. But instead of attaching the skirt to the onesie I want to make it into an apron type thing so it can be used with different onsesies. Do you think it would work?
O i love it..
I'm so going to make it for my little girl...
Post a Comment