And what's up with the padding? It's falling out of the sides. I'm just laughing to myself. How embarrassing.
Yeah, it's pretty bad when you iron your clothes and you end up with the impressions on your clothing from the metal below. Hmmm... no wonder that happens. Check out the quality of my padding.
In an attempt to be green, I'm going to use part of my old ironing board cover before happily disposing of it in the trash. I cut off about two inches all the way around the edging/gathering piece to reuse.
Then I used the remaining cover as a template for my new cover. Next time I would cut an extra 2 inches around my template.
Then I marked the center points on both the top and bottom of the fabric and gathering piece.
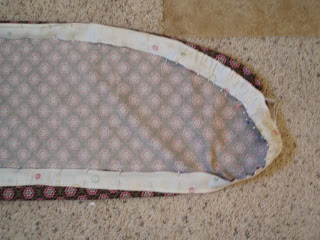
Pin the pieces together right sides facing each other on the top and bottom center points. Then starting at the top, work your way around the fabric, pinning a little on the right and then on the left. Doing this ensures that it will be even all the way around and that you're not left with a bunch of extra fabric at the end. Ummmm... yes, I'm speaking from experience. ;) Let my mistake save you some time.
On the corners, gather and pin your fabric.
Here it is all pinned.
Now sew it all together. I used a zig zag stitch, but I'm sure a straight stitch would work just fine.
Now for my padding, I decided to pick up a thick pad from Target. I priced out thick padding at Joanne's before and decided that this padding at Target would be cheaper and save me some time. I still wanted to cover it with a prettier fabric though.
Then I slipped my new cover on top and cinched it up and voila! A new, pretty, stain-free, truly padded ironing board cover.


14 comments:
Love the new fabric. Great job!!!
Oh my goodness! I have been meaning to do this for forever!! I LOVE the idea of using the rim of the old one! Ingenious! I'm totally doing this now.
Oooo...totally great! I need to make a new cover for my vintage wooden ironing board and I'm gonna bookmark your tutorial....thanks oodles!
I'm following...would love to have you pop over to my place for my first ever giveaway!)
peace, cindy
I need to replace my ironing board cover too, but I'm not sure I have the sewing skills! Yours turned out great! I really like the fabric.
pk @ room remix
love it! I've been wanting to recover my board for ages... I'll have to try your way!!!
It's gorgeous! I was JUST thinking about redoing my ironing board cover because it looks JUST like your before pic :)
Thanks for the tutorial!
Great job! So pretty and so functional! Love it :)
What a cute ironing board cover!
Thanks for joining my linky party, I hope to see you there again!
So clever! I love it!
I love the fabric! I scooped up an ironing board that was on the side of the road - someone was throwing it away. In great shape but had no cover. I may just have to do this!
Way cuter now, for sure! I really enjoyed looking around your blog! What great ideas!!
*Eliza’s blog*
I did this same project on my blog. I LOVE my new ironing board. So easy yet so fun now! No more metal impressions on our clothes for both of us!! Yours turned out great!!
I am doing research for my college thesis, thanks for your helpful points, now I am acting on a sudden impulse.
- Kris
hi, good site very much appreciatted
Post a Comment