Here are a couple I've looked at:

Pottery Barn $79

Red Envelope $89.95
I really didn't like those prices. So I recently found this jewelry box at Goodwill and thought that it would be the perfect solution to my problum.
First, I sketched out where I wanted the opening for the cords to go.
Currently I don't need the opening to be so big, but I'm trying to plan ahead.
I'm not sure what electronics will be added in the future, so I made the opening big to accommodate anything.
Next, I wanted to remove the wood directly below the cover to make room for the jigsaw.
The space also needed to be cleared for the power strip.
I was pleasantly surprised by how easy it was to remove.
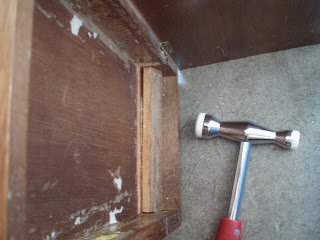
I used a hammer to remove the small wood piece.
Then I was able to punch out the bottom piece with my hands.
Now there was plenty-o-room for the power strip and cords to go.
Next I drilled 2 holes in the top so that the jigsaw blade would fit.
Just in case you haven't read my previous posts, I'm blessed to have a boss with a contractor hubby who lets me borrow his tools.
I used his jigsaw to cut out the rectangular piece.
Yummmm!! Have I mentioned lately how much I LOVE power tools???
Then I used my chisel to even out the edges.
And used the chisel again to take off the front panel.
I removed the hardware from the front and filled the holes with wood filler.
I turned it over and found the center point to drill my hole for the extension cord to go through.
I used my drill and new attachment to make the hole.
How pretty is that??
Then I just gave everything a good sanding. This next part made me laugh. It confirmed that I'm definitely a DIY GIRL. To sand in those hard to reach places, I used something I already had on hand.
It worked GREAT! After I was done, I was curious to see if it still worked.
Yip! Still worked great on my nails!
Ok... so after the sanding, I primed it, and gave it two good coats of Heirloom White.
Ready for it???
Just a reminder of the BEFORE:
And here's the fun AFTER:
I'm going to look for another power strip that is a tad bigger, but for now this will do.
So a $1.50 investment = A Reasonably Priced Charging Station (and a happy girl)
I'm participating in Met Monday and DIY Day


20 comments:
I LOVE it! You broke out the power tools and all!! Great Job! Jewelry boxes are so much fun to makeover!! I love that you changed the use of yours and made it work for you! Awesome redo!
Thanks for Stoppin by to see mine!
Clever girl! This was a terrific idea. ~ Sarah
How clever -- I've looked at them as well but only looked because of the price! You did well.
Super job and waaaaaaay creative !
Kammy
Brilliant. I've been in the market for one of those things for forever. I hate seeing all the phone cords on my kitchen counter. Now, I'll have my eyes peeled for a jewelry box.
Wow, thats great!
That is a brilliant idea! You did a great job!
Absolutely brilliant! You are one talented DIYer.
This is genius, Nori! Great job!
Aren't you smart! LOVE IT!
This is great! What a great idea.
Awesome job! Love it :)
That is FABULOUS!! Love it! :)
Bookmarking, emailing to hubby...He has plans to make one but never gets to it, maybe he's looking for inspiration!
I host a "Room a month makeover" every Monday (Don't worry, you don't have to complete a room, a small change!) Stop by and link up!
http://theshadesofpink.blogspot.com/2009/09/room-month-is-back.html
So, so smart! Can't wait to find a jewelry box & try this myself!
Eat your heart out PB and all those big names...your project turned out fabulous!!! Great job!!!
so smart and savy, awesome project!
Sonia
Great idea - I never would have thought of using a jewelry box, but its a perfect size for a charging station!
What a clever idea!!
That is awesome! I need to start looking for something like that! And I think being a DIY GIRL is the way to go!!! At least it is at my house if I want any hope of it getting done!
Post a Comment