First off, I have to say that I totally copied this from and was inspired by CraftyNest. Check out HER sexy rolling tool chest. After I saw her transformation, I told everyone about it and I just had to make one. I'm trying the best to organize with what I have, but with all of the projects and the growing amount of supplies I'm purchasing, my garage is getting to be a complete mess.
When I saw this dresser for $10 at a garage sale this weekend, I knew just what it would become. Here's my before:
 The dresser was a tad bit wabbly, so after I removed the handles and filled the holes with wood filler, I turned it on it's back and took a look at the base. The nails were loose and someone tried to use a screw and split the wood.
  Ouch! Poor baby. I took out all the nails and the screw and went to town on it.
When putting screws in, it's always a good idea to drill a hole first (*PLUS it's another opportunity to use your power tools!! And you know how much I luuuuuv that!):
 And then screw in your screw:
  See? No split wood:
  Awwwww yeah baby!!! Then I filled the split and broken parts with wood filler. There are other screws in there, they're just hiding under wood filler.
  Then it was wait time. OMGoodness. I can barely wait for a coat of paint to dry. It's REALLY difficult to wait overnight for wood filler to dry. I learned though. My last project I couldn't wait and it didn't come out all smooth and pretty. So I distracted myself with other projects.
The next day after sanding and priming, I busted out my recent "Opps paint" purchase (you gotta love Home Depot and their $5 gallons of paint). Only it wasn't a Opps. It was a left behind. That just sounds so sad. :(
 While applying my first coat of paint
  I actually said out loud, "Poor thing, who could leave you behind? You're so pretty". Ummm... I'm talking to PAINT. What's wrong with me?? I think I've inhaled too much spray on poly.
Ok... so remember the before?
 And here's the AFTER!
  I even found a place for my tool box and some of the tools that were inside (I have some plans for the other tools which you'll see soon).
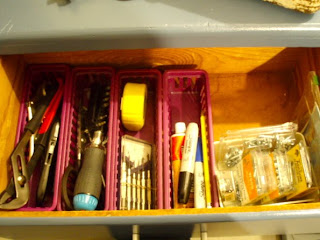
  Darn it! I forgot to take before shots of the mess in my garage. I'm always too embarrassed to show my messes (but believe me there are some BIG messes), but then when I see the after all pretty and organized, I wish I had. Here are the insides.


 I couldn't believe how much fit into this little dresser, I mean, sexy tool cabinet. After stocking it with the supplies in the garage, I even brought some things down from inside my house. OMGoodness. Organization has such a happy and calming effect on my heart. I should do it more often. ;)
Here's my attempt at trying to remember how much I invested in this project.
$10 Dresser
$5 Paint
$10 Handles
$8 Plastic containers
$33?? Not too shabby!
I'd like some feedback on this if you have a moment. The hardest part of this project for me was drilling holes for the new handles. How do you plan out where the holes go? The first two ended up a little crooked. Eh. Adds to her charm. No big deal, but I'd really like to know how to do it right for the next go around. As always, I totally appreciate your comments and thanks for looking!
Join the fun and check out the other DIY transformations!


5 comments:
Hi there! I love it! Do you mind if I feature it on my blog? (with credit to you, of course!) I just started a new blog of all my favorite before & after projects. C'mon over and check it out!
looks great, what a good idea and great transformation!!
How neat, I love the paint color! I'm finding that my tool collection is growing rapidly since I started more home improvement projects.
That looks great! And so useful, too.
OOOOOH! Too cute! We just gutted out our garage and I think I need a sexy tool dresser for all my crafting junk...er...I mean supplies! LOL! Thanks for the "Oops" paint tip too, I didn't know Home Depot did that!
Post a Comment