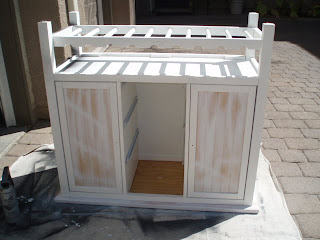

I'm still trying to find my style, but I tend to go for the more modern, clean lines. This piece had a bit of a country feel to me, so I wanted to make a few changes to give it a more modern feel. First, I gave it a light sand and primed it. I like to start working on most of my pieces from the bottom up so I make sure that I don't miss anything and also so I don't kill my back.
On the first coat, I used two 98 cents cans of paint that I already had on hand to save money. After letting it dry, I went over everything with Rustoleum's black satin semi-gloss to give it that pretty shine.
I wasn't really concerned about getting full coverage on the panels because I had other plans for that area. As you can see, I had a hard time getting to the bottom rungs of the piece. No worries though. I knew that I wanted to store things underneath, so I had other plans for that area too.
I measured out all the recessed paneled areas and cut out my recent wrapping paper find to fit. I glued the paper using Zips.
I planned on using Modge Podge, but just in case down the road I want to change it out, I don't want to have to deal with ripping it all off. Zips is a lot like a hot glue gun without dealing with the long spider webby strands that occur when you pull the gun away and hardened glue that sometimes shows through. It sticks REALLY well.
Ribbon $1.95
Wrapping paper $2.25
Fabric $4.20
Total: $14.15
I'm loving the cost of this transformation! I think it's my favorite so far. :)
Here's a quick breakdown of the rest of my transformation process from a complete novice at sewing (so please forgive me if I don't use the correct terms):
Cut 4 panels of fabric.
Sew together with right sides facing each other.
Iron the hem- it's helps keep a straight edge while sewing.
Press the parts that you sewed together- it will give it a crisp look.
Sew! It helps it "flow" if you arrange it in a nice neat pile in your lap.
I made sure to keep my fabric in line with the line at 10 so that I would have a straight hem.
I learned how to make this ruffle from Britt over at A Penny Saved. See her post for great instructions. I'm all about eyeing things and not having to deal with the stress of measuring.
Measure out double the length of the sides and pin.
Pull and find the midpoint and pin and repeat.
Then fold over and pin to create your ruffles.
I forgot to take a picture, but next I pressed the ruffles and then did a zig-zag stitch on the top of the whole thing to keep it in place.
Next I stapled it up on my piece.
Once the fabric was secured, I used this glue to adhere my ribbon border.
I used this glue because I wanted my ribbon to lay flat on the fabric. See how pretty??
Here's a reminder of the BEFORE:
And here is the AFTER!
I need to finish decorating the top, but here's an idea of what it looks like with the area surrounding it:
A breakdown of costs:
Furniture Free
Paint $5.75Furniture Free
Ribbon $1.95
Wrapping paper $2.25
Fabric $4.20
Total: $14.15
I'm loving the cost of this transformation! I think it's my favorite so far. :)


29 comments:
That is a fantastic makeover! It really looks amazing! :)
Good book bargains in your last posts, Nori! Your transformation of this freebie is amazing. It looks good done up all in black and with the fabric inserts. Where do you get this Zips product? I've never heard of it, but it sure sounds like a nice alternative to burning your fingers with hot glue!! Thanks for paying me a visit. I'm off to see more of your posts!
:-) Sue
What an amazing transformation. You're a clever girl!
Thank you for your comments! I'm so happy you like my transformation. It's so fun looking at it every day. :)
Sue, I purchase Zips at Michael's. Just look in the adhesives section usually located in the scrapbooking section.
This is one amazing transformation! Great job! And I love your blog name, mine is Loves To Create ;) Hugs from Conroe, TX!
This cabinet turned out so cute! Very clever idea to add the skirt on the bottom. It really gives a lot of character to the piece. And thanks for the info on Zips. I was not aware of that product but it sounds like something all of us DIYers should have on hand.
I like that black. The ruffle at the bottom gives it a country look.
This is such a great transtion!
I really like the material touch -- just another texture that adds the class.
Stop by my blog if you have a minute... I would love to see you.
TTFN~~ Claudia ♥ ♥
Fabulous makeover! You made it look very expensive!
Sherrie
Nice makeover! Indeed a very modern and crisp look. And you did a great job with the sewing!
I don't know if that's where you got it from but the Nester (nestingplacenc.blogspot.com) uses that technique a lot for her mistreatments.
Very cute transformation!
Nori-I'm hitting your follow button! If you have more ideas with great instructions like this I want to make sure I don't miss them! Great job!
Wow! What a gorgeous transformation! Great job, girl! :)
Roeshel
Love it! I'm definitely posting it on my blog!
This looks fantastic!!! I can't believe your grand total of $14. Wow!
What a great transformation. Very creative. Adding the little sassy skirt just made it! Rhonda
You did a great job.
I hope you will come by for a visit.
Cheri
Its So Very Cheri
Bravo Bravo what a wonderful makeover.
Wow, Nori! Great job! I love seeing what you are finding and creating. It looks like so much fun. Thanks for sharing!
I absolutely love this makeover! You are an inspiration for all of us.
This is a great post. Good job! Lisa~
Great job on the cabinet. Love the ruffled bottom.~ ~Ahrisha~ ~
Good job! I usualy don't like black transo that much but this one is cool. Must be the panels!
thanks for entering the party!
OMG! THAT is gorgeous! Great job!
Looks gorgeous!
Very Cute!!! Great description as well... Awesome Job!!!
~Whitney
Beautiful - I love the pizazz added by the wrapping paper panels!
That is very cute. It's chic in black and the fabric gives a something extra.
What an amazing transformation! I really inspires you to look at objects differently! BTW - found your blog from Tip Junky and put it in my favorites - Please inspire me MORE!!!
Post a Comment